Tutorial: 4 Easy Steps to Your Perfect Score Layout
Setting up your score layout is an important step in finalizing your music. And in the video below, we’ll take you through four steps that you can follow to get that perfect score page.
Please note: FORTE Home and FORTE Premium support all possibilities displayed here; the Free and Basic editions of FORTE provide limited layout options.
Video too fast? Here’s the (slightly edited) transcript…
Step 1 – General setup
You can find your layout options in the main menu, see under “Score” and in the group “Layout.”
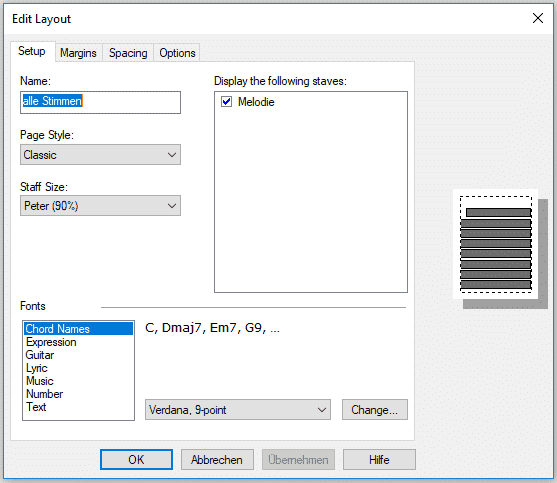
Then click, tab “General” and you’ll see the “Setup” information. You can define the more general style guidelines here.
For example, you can select instruments, edit text size, lyrics and staves, and name the score.
On the right-hand side, you’ll see a small preview.
This preview is a great help when creating your layout. You can immediately see the effects of your layout editing in this box.
The gray boxes symbolize the staves – please keep the gray boxes within the dotted frame.
The option “Staff Size” allows you to scale the size of the staves up or down. If you select a different staff size, you can preview the result in the preview box on the right-hand side.
If you write music for several instruments, a scale of 70 to 90% will be optimal. We also recommend the value of 70 to 90% when you’re planning on many systems per page.
Let’s look at “Fonts” next. You can edit the global font types and sizes for your score here.
You can also edit the lyrics as well as the numbers used to count the measures and the pages.
Of course, you can also adjust the styles of the general text, the chord names and the style of guitar charts. This principle applies to all elements.
Step 2 – Margins
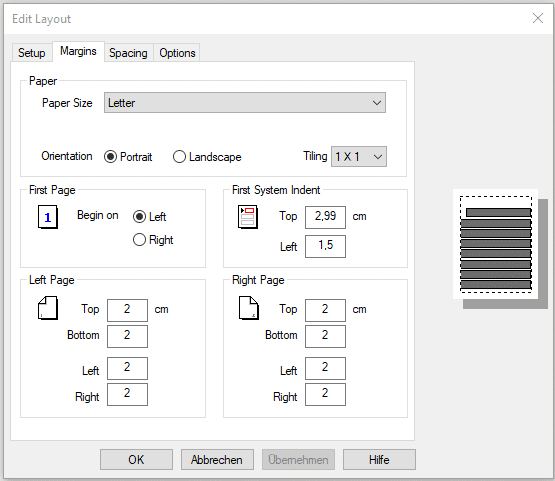
To set up the page margins for your score, click “Margins.”
In the upper area, you can select the paper size as well as switch between portrait and landscape orientation.
The item “First System Indent,” helps you define the indent of the first system from the left and from the top of the page.
In the lower area, you can set up the format for your left and right pages.
If you want to print on single pages, keep the values the same for both pages.
We generally recommend a 2cm margin for your pages, but if you need more printing space for your music, you can simply reduce the margin.
(Please note: not all printers support borderless printing.)
Once you set up the margins, these settings will be applied to your entire score.
Step 3 – Spacing
The spacing settings are some of the most important layout options for your FORTE score. Changing and adjusting the values of this tab influences the spacing of your staves, your lyrics and all the elements around your notes.
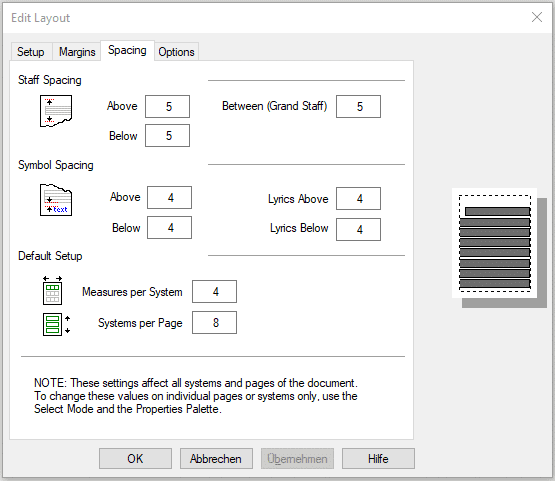
The settings are found in “Spacing.”
The values for “Staff Spacing” and “Symbol Spacing” refer to ledger lines above and below. They do NOT represent metric units. For example, if you select “5” as your staff spacing above, the space of five ledger lines above the staff will be respected.
If you select a number that is too small, you won’t be able to write notes above the staff at all. We recommend you use three to five spaces in each category.
Your adjustments will again be instantly visible in the preview of your layout on the right-hand side.
If you write for a piano or a grand staff, there is a separate spacing value.
Using “Symbol Spacing,” you can set the spacing between the staff and your elements. Note, if I increase the value here, the piano symbol will shift upwards.
You can set up the spacing value for your lyrics here as well.
“Default Setup” sets the general amount of measures per system and systems per page for your score. If you write a song with a lot of lyrics and small note values, two to four measures per system should work well.
The option “Systems per Page” edits the amount of systems per page. With larger scores, you’ll find one or two systems enough for one page.
Check the layout preview on the right-hand side. If the gray boxes don’t fit within the borders, decrease the values until they do.
If you still need more space on your page, go back to the spacing options, the margin options, or the staff size above.
Step 4 – Detailed options
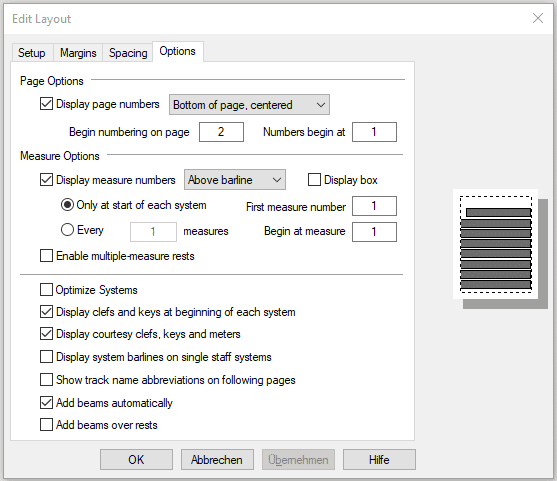
With the last tab, “Options,” you can edit the display of your page and measure numbers.
The option “Enable multi-measure rests” is also here.
Within a part of your score, you can automatically merge rest measures. With this option activated, any more than four rest measures will be merged.
Furthermore, you can activate the display of clefs and keys at the beginning of each system.
You can also disable the automatic beaming of notes, an option that may be vital for your choir music.
We hope you have a lot of fun creating your perfect score layout!
What now?
If you don’t already have FORTE notation software, why not download a FREE 14-day trial and try it out for yourself?
And finally, we’d love to know if you found this video and post helpful… let us know in the comments below!








Is there a way to print a cover page or front page? I want to print a 4-page score so the first page is on the left and second page on the right, which means I need to print something on Page 1 – either a blank page or it could be a cover/title page.
Dear Matthew, unfortunately FORTE doesn’t support this yet. What you can do, however, is print the cover page separately (e.g., in MS Word), and then delete all title texts in FORTE. Then you can export both the .doc an the .fnf file to .pdf and bundle them together this way. It’s more of a workaround than a solution, but it might help. Best, Felix from FORTE
I would like to input a solo instrument mp3 file and output the score.
Is this possible with FORTE?
Dear Bromberg,
unfortunately, no, it’s not possible to import mp3 and convert that into music notation.
You can import midi files and MusicXML files.
Kind regards,
Your FORTE team